If you need a free SFTP client for Mac, use Cyberduck for a graphical folder view or use the sftp command in Terminal for a quick transfer. Check your host’s protocol first. SFTP uses SSH, FTPS uses FTP with TLS, and plain FTP sends traffic without encryption.
What to ask your host for
Get the server hostname, protocol, port, username, authentication method and expected SSH host-key fingerprint. Ask which folder your account may use for testing. The hostname for SFTP can differ from your website address.
Use Cyberduck as a free SFTP client for Mac
- Download Cyberduck from the official site and check its current macOS requirements. Open a new connection and choose SFTP (SSH File Transfer Protocol).
- Enter the host, port and username supplied by your provider. Use the authentication method it configured for your account.
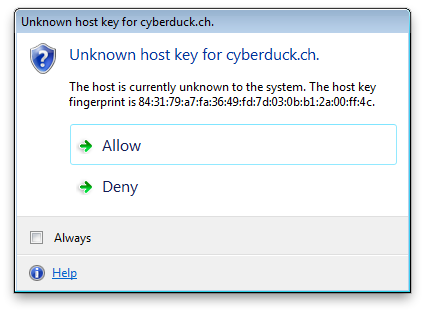
- Compare the displayed host-key fingerprint with the value from your provider before accepting it. If a previously accepted key changes, stop and ask the provider to verify the change.
- Confirm that you can see the expected folder. In a test folder, upload a small non-sensitive text file with a unique name. Download it into a different local folder and open it. A successful login alone does not prove you have upload permission.
See Cyberduck’s SFTP documentation for supported authentication options.
Use Terminal for a quick connection
Replace the example username, host and port with your own details. The uppercase -P specifies the port.
sftp -P 2222 username@sftp.example.comVerify the host key as you would in Cyberduck. Once you see the sftp> prompt, use pwd and ls to confirm the remote folder. Use bye to disconnect. See the OpenSSH SFTP manual for the command options.
If the connection fails
- Timeout or connection refused: check the hostname, port and whether the host requires a VPN or IP allowlist.
- Permission denied before login: confirm the username and configured password or SSH key with your host.
- Login works but uploads fail: check which remote folder the account can write to. Use a test folder before changing website files.
If your host provides FTPS only, use the exact TLS mode and port it specifies. For other platforms, see Techmixer’s FTP and SFTP client guide. For recovery planning before changes to a live site, see the backup and sync hub.
Keep the first transfer deliberately small. A file that appears in the remote folder proves the upload reached that location. Download it again and compare the contents before trusting the connection for site changes. If you plan to bookmark the connection, give the bookmark a name that distinguishes staging from production.
Check the remote folder before changing a site
Ask the hosting provider for the expected destination directory. Compare it with the path shown after login, especially if you manage several websites from the same account. Keep a local copy before replacing a file and use a non-sensitive test file in an approved folder. An SFTP account can be allowed to list a directory while being denied writes there.
Our take: Cyberduck suits occasional transfers when you want a visual folder list. Terminal is useful for a quick check and makes the connection details explicit. This walkthrough follows Cyberduck and OpenSSH documentation. The transfer example is illustrative.