Free app hosting can cover a small personal web app if your project qualifies for each plan and stays within its usage limits. Deploy the signed-in Next.js app on Vercel, keep notes in Neon Postgres, let Clerk handle login, and store private attachments in Cloudflare R2. Connect GitHub to Cloudflare Pages if you also want a public landing page. That landing page and the app are two separate deployments.
This walkthrough builds My App, a private notes board. A signed-in user can save a note, upload one small text attachment, and download their own attachment. Start with one account, then use a second to check that the two users cannot see each other’s data.
What each service does
| Service | Job in My App | What to watch |
|---|---|---|
| GitHub and Cloudflare Pages | Source control and an optional static landing page | Use the landing page’s build directory and keep secrets out of the repository. |
| Neon | Stores notes and their owners in Postgres | Watch storage and compute allowances. |
| Clerk | Signs users in and provides their user IDs | Development and production keys have different roles. |
| Cloudflare R2 | Stores private attachment bytes | Standard has a free allowance and metered usage beyond it. |
| Vercel | Builds and runs the Next.js app from GitHub | Hobby is for personal, non-commercial use. |
The free CDN comparison helps you choose how to deliver public assets. For uploads you need storage first. This example uses R2 as a private bucket and serves downloads only after the app checks the session.
1. Set up GitHub and free website hosting on Cloudflare Pages
With a current Node.js LTS release, scaffold a Next.js App Router project. Choose TypeScript, use the root-level app/ directory, and leave Cache Components disabled for this example. Then install the SDKs:
npx create-next-app@latest my-app
cd my-app
npm install @clerk/nextjs @neondatabase/serverless @aws-sdk/client-s3
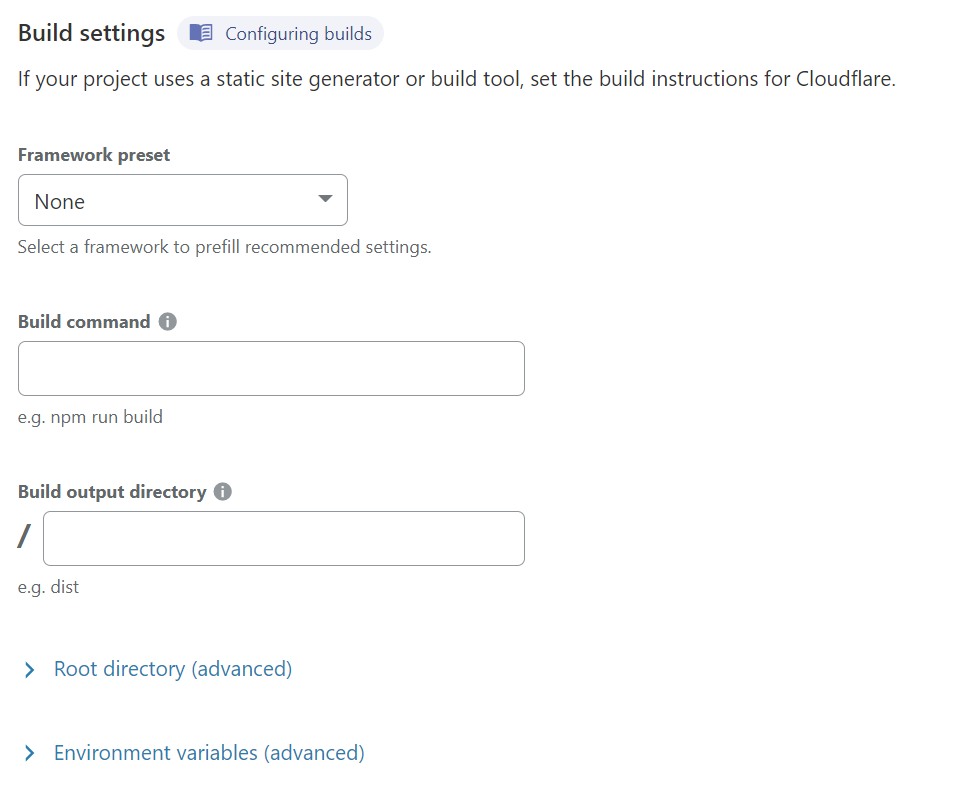
Push the project to a GitHub repository once the starter runs. Confirm .env.local is ignored before committing. For the optional landing page, use a separate repository with public/index.html. In Cloudflare Workers & Pages, create a Pages project from that repository, select the production branch, leave the build command blank for plain HTML, and use public as the output directory. An initial deployment should open at the assigned pages.dev address. Add a link to your Vercel app once it has a URL. See the Techmixer Cloudflare Pages guide and Cloudflare’s Git setup.
2. Create the notes table in Neon
Create a Neon project and use the SQL Editor for the target database. The owner_id column will hold the user ID returned by Clerk. Create the table and an index for looking up a user’s latest notes:
CREATE TABLE IF NOT EXISTS notes (
  id bigint GENERATED ALWAYS AS IDENTITY PRIMARY KEY,
  owner_id text NOT NULL,
  body text NOT NULL CHECK (char_length(body) BETWEEN 1 AND 500),
  created_at timestamptz NOT NULL DEFAULT now()
);
CREATE INDEX IF NOT EXISTS notes_owner_latest
  ON notes (owner_id, id DESC);
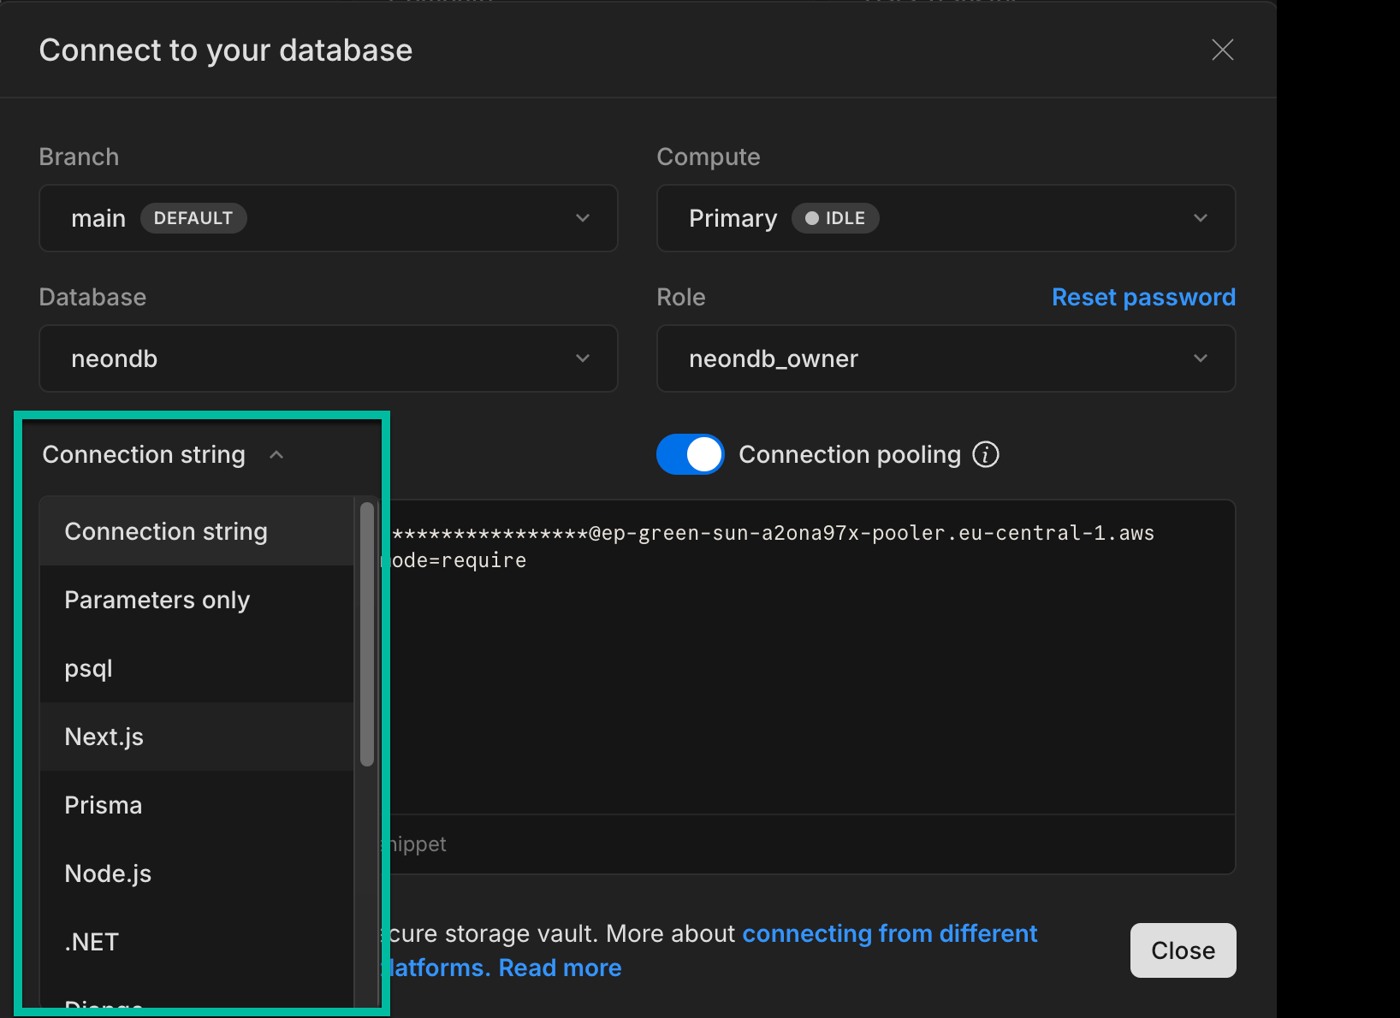
Open Connect in Neon, select the matching branch and database, and copy the connection string to DATABASE_URL in .env.local. Keep it on the server. If the app reports that the table does not exist, compare the branch and database in the connection dialog with the ones you selected in the SQL Editor. For a shared deployment, use a separate database role with only the permissions the app needs. See Neon’s connection guide.
3. Set up Clerk sign-in and add the notes page
Follow the manual steps in Clerk’s App Router quickstart to create a development instance, set NEXT_PUBLIC_CLERK_PUBLISHABLE_KEY and CLERK_SECRET_KEY, add clerkMiddleware(), and put ClerkProvider in the root layout. For Next.js 16 and later the request hook is proxy.ts. Use middleware.ts with Next.js 15 and earlier. Keep the quickstart’s matcher so Clerk also sees the API routes.
Replace app/page.tsx with the example below. The server reads the session again on every save, and the query uses that session’s user ID. The form never supplies an owner ID. Sign in, add a note, and refresh the page. Then sign in with a second test account and check that the list is empty.
import { SignInButton, UserButton } from '@clerk/nextjs'
import { auth } from '@clerk/nextjs/server'
import { neon } from '@neondatabase/serverless'
import { revalidatePath } from 'next/cache'

export const dynamic = 'force-dynamic'

async function saveNote(formData: FormData) {
  'use server'
  const { userId } = await auth()
  if (!userId) throw new Error('Sign in to save a note.')
  const raw = formData.get('body')
  const body = typeof raw === 'string' ? raw.trim() : ''
  if (!body || body.length > 500) throw new Error('Use 1 to 500 characters.')
  const sql = neon(process.env.DATABASE_URL!)
  await sql`INSERT INTO notes (owner_id, body) VALUES (${userId}, ${body})`
  revalidatePath('/')
}

export default async function Home() {
  const { userId } = await auth()
  if (!userId) {
    return <main><h1>My App</h1><SignInButton /></main>
  }
  const sql = neon(process.env.DATABASE_URL!)
  const notes = await sql`
    SELECT id, body FROM notes WHERE owner_id = ${userId}
    ORDER BY id DESC LIMIT 20
  `
  return (
    <main>
      <h1>My App</h1>
      <UserButton />
      <form action={saveNote}>
        <label htmlFor="body">New note</label>
        <input id="body" name="body" required maxLength={500} />
        <button type="submit">Save note</button>
      </form>
      <ul>{notes.map(note => <li key={note.id}>{note.body}</li>)}</ul>
      <form action="/api/attachment" method="post" encType="multipart/form-data">
        <label htmlFor="file">Replace your private text attachment</label>
        <input id="file" name="file" type="file" accept=".txt,text/plain" required />
        <button type="submit">Upload</button>
      </form>
      <a href="/api/attachment">Download your attachment</a>
    </main>
  )
}
4. Store one private attachment per user in R2
Create an R2 Standard bucket and leave public access disabled. Create S3-compatible credentials scoped to that bucket with object read and write permissions. In .env.local set R2_ENDPOINT to the endpoint shown in the dashboard and add R2_BUCKET, R2_ACCESS_KEY_ID, and R2_SECRET_ACCESS_KEY. See the R2 S3 setup guide and the Techmixer R2 walkthrough.
Save the route below as app/api/attachment/route.ts. The object key comes from the signed-in user ID. Each upload replaces that account’s previous attachment, and the server caps files at 256 KiB. Use a harmless plain-text test file. The download response uses a fixed filename and attachment headers. If you later allow public sign-ups, add per-user request quotas before exposing uploads.
import { auth } from '@clerk/nextjs/server'
import { GetObjectCommand, PutObjectCommand, S3Client } from '@aws-sdk/client-s3'

export const runtime = 'nodejs'
export const dynamic = 'force-dynamic'
const maxBytes = 256 * 1024

function storage() {
  return new S3Client({
    region: 'auto',
    endpoint: process.env.R2_ENDPOINT!,
    credentials: {
      accessKeyId: process.env.R2_ACCESS_KEY_ID!,
      secretAccessKey: process.env.R2_SECRET_ACCESS_KEY!,
    },
  })
}

function objectFor(userId: string) {
  return {
    Bucket: process.env.R2_BUCKET!,
    Key: `users/${userId}/attachment.txt`,
  }
}

export async function POST(request: Request) {
  const { userId } = await auth()
  if (!userId) return new Response('Sign in first.', { status: 401 })
  if (request.headers.get('origin') !== new URL(request.url).origin) {
    return new Response('Invalid origin.', { status: 403 })
  }
  const length = Number(request.headers.get('content-length'))
  if (!length || length > maxBytes + 8192) {
    return new Response('Use a small text file.', { status: 413 })
  }
  const file = (await request.formData()).get('file')
  if (!(file instanceof File) || file.type !== 'text/plain' || !file.size || file.size > maxBytes) {
    return new Response('Use a .txt file up to 256 KiB.', { status: 400 })
  }
  await storage().send(new PutObjectCommand({
    ...objectFor(userId),
    Body: new Uint8Array(await file.arrayBuffer()),
    ContentType: 'text/plain',
  }))
  return new Response(null, { status: 303, headers: { Location: '/' } })
}

export async function GET() {
  const { userId } = await auth()
  if (!userId) return new Response('Sign in first.', { status: 401 })
  try {
    const result = await storage().send(new GetObjectCommand(objectFor(userId)))
    const bytes = await result.Body!.transformToByteArray()
    return new Response(Uint8Array.from(bytes).buffer, { headers: {
      'Content-Type': 'text/plain; charset=utf-8',
      'Content-Disposition': 'attachment; filename="attachment.txt"',
      'Cache-Control': 'private, no-store',
      'X-Content-Type-Options': 'nosniff',
    } })
  } catch (error) {
    if (error instanceof Error && error.name === 'NoSuchKey') {
      return new Response('No attachment yet.', { status: 404 })
    }
    throw error
  }
}
Run npm run dev. Upload a test file and download it again. Verify that a signed-out request to /api/attachment receives 401, and that a different account sees 404 until it uploads its own file. If storage fails for a signed-in user, check the bucket name, endpoint and token scope. If you move to larger browser uploads, consider short-lived R2 presigned URLs issued only after an authorization check.
5. Deploy the app from GitHub to Vercel
- Commit the app files and lockfile. Check that no database URL, Clerk secret, or R2 key is in the commit.
- In Vercel, import the GitHub app repository and use the Next.js preset. Add the same environment variable names under Project Settings, with values for each environment you intend to deploy. Keep Preview pointed at test data and separate credentials when practical.
- Deploy and open the assigned
vercel.appaddress. Test sign-in, note persistence and file isolation with disposable accounts. If you change variables, redeploy so the new deployment uses them.
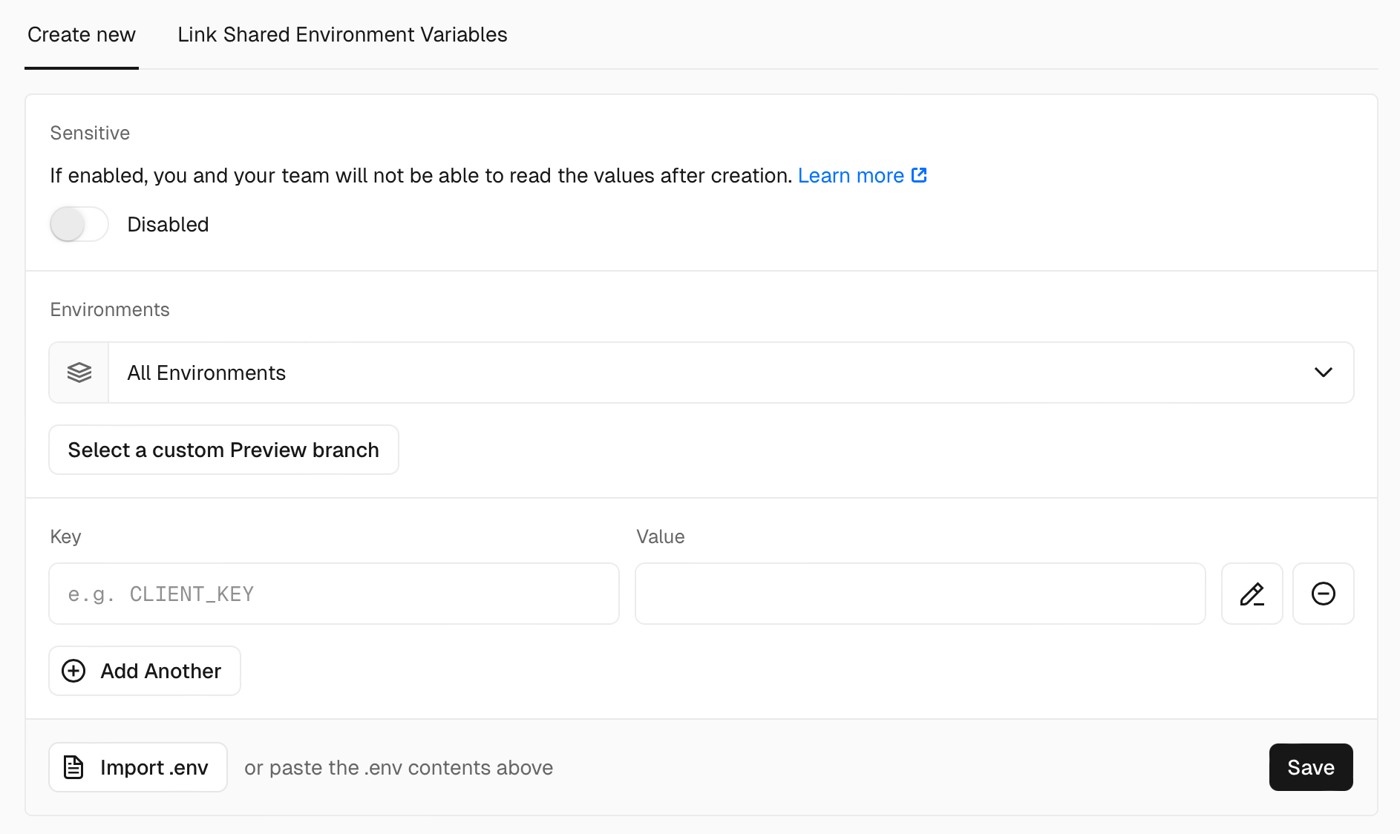
Follow Vercel’s GitHub deployment guide. A production branch deployment on Vercel and a production instance in Clerk are different things. Use Clerk development credentials only for a demo and follow Clerk’s production guide for real users, including its domain and live key setup. A custom domain can add a cost if you do not already own one.
When can free app hosting stay at $0?
A personal demo with a few test users, small notes and occasional attachments can fit the included allowances. Vercel restricts Hobby to personal, non-commercial use. If the app is for a business or clients, price the appropriate hosting plan before deployment. Check the Cloudflare Pages limits if you expect frequent builds.
At the time of review, Neon Free lists 1 GB of Postgres storage and 100 compute-unit hours per month per project, subject to its account and transfer limits. Clerk Hobby lists a limit of 50,000 monthly retained users per app. Retained users are Clerk’s billing metric. Check those usage counters independently of your hosting usage.
Cloudflare R2 Standard includes 10 GB-month of storage, 1 million Class A operations and 10 million Class B operations per month. Cloudflare charges for usage above the allowances and the allowance applies to Standard storage. For example, ten 256 KiB test files kept for a full month use roughly 2.5 MiB of storage, well below the storage allowance. Requests still count separately. See R2 pricing before enabling uploads.
Our take
To test this free app hosting setup, deploy sign-in and one saved note first. Add R2 once you know you need attachments, then add the Pages site if you need a separate public home. The clearest success check is that two accounts can each save and retrieve their own data on the deployed app.
Last reviewed: 9 November 2026. Techmixer checked vendor documentation and plan terms. The code is a worked example. A live deployment and cross-account tests are reader verification steps.